

Best Sandwich Bread
As an Amazon Associate I earn from qualifying purchases. Which means, at no cost to you-I get a commissions for purchases made through links in this post.
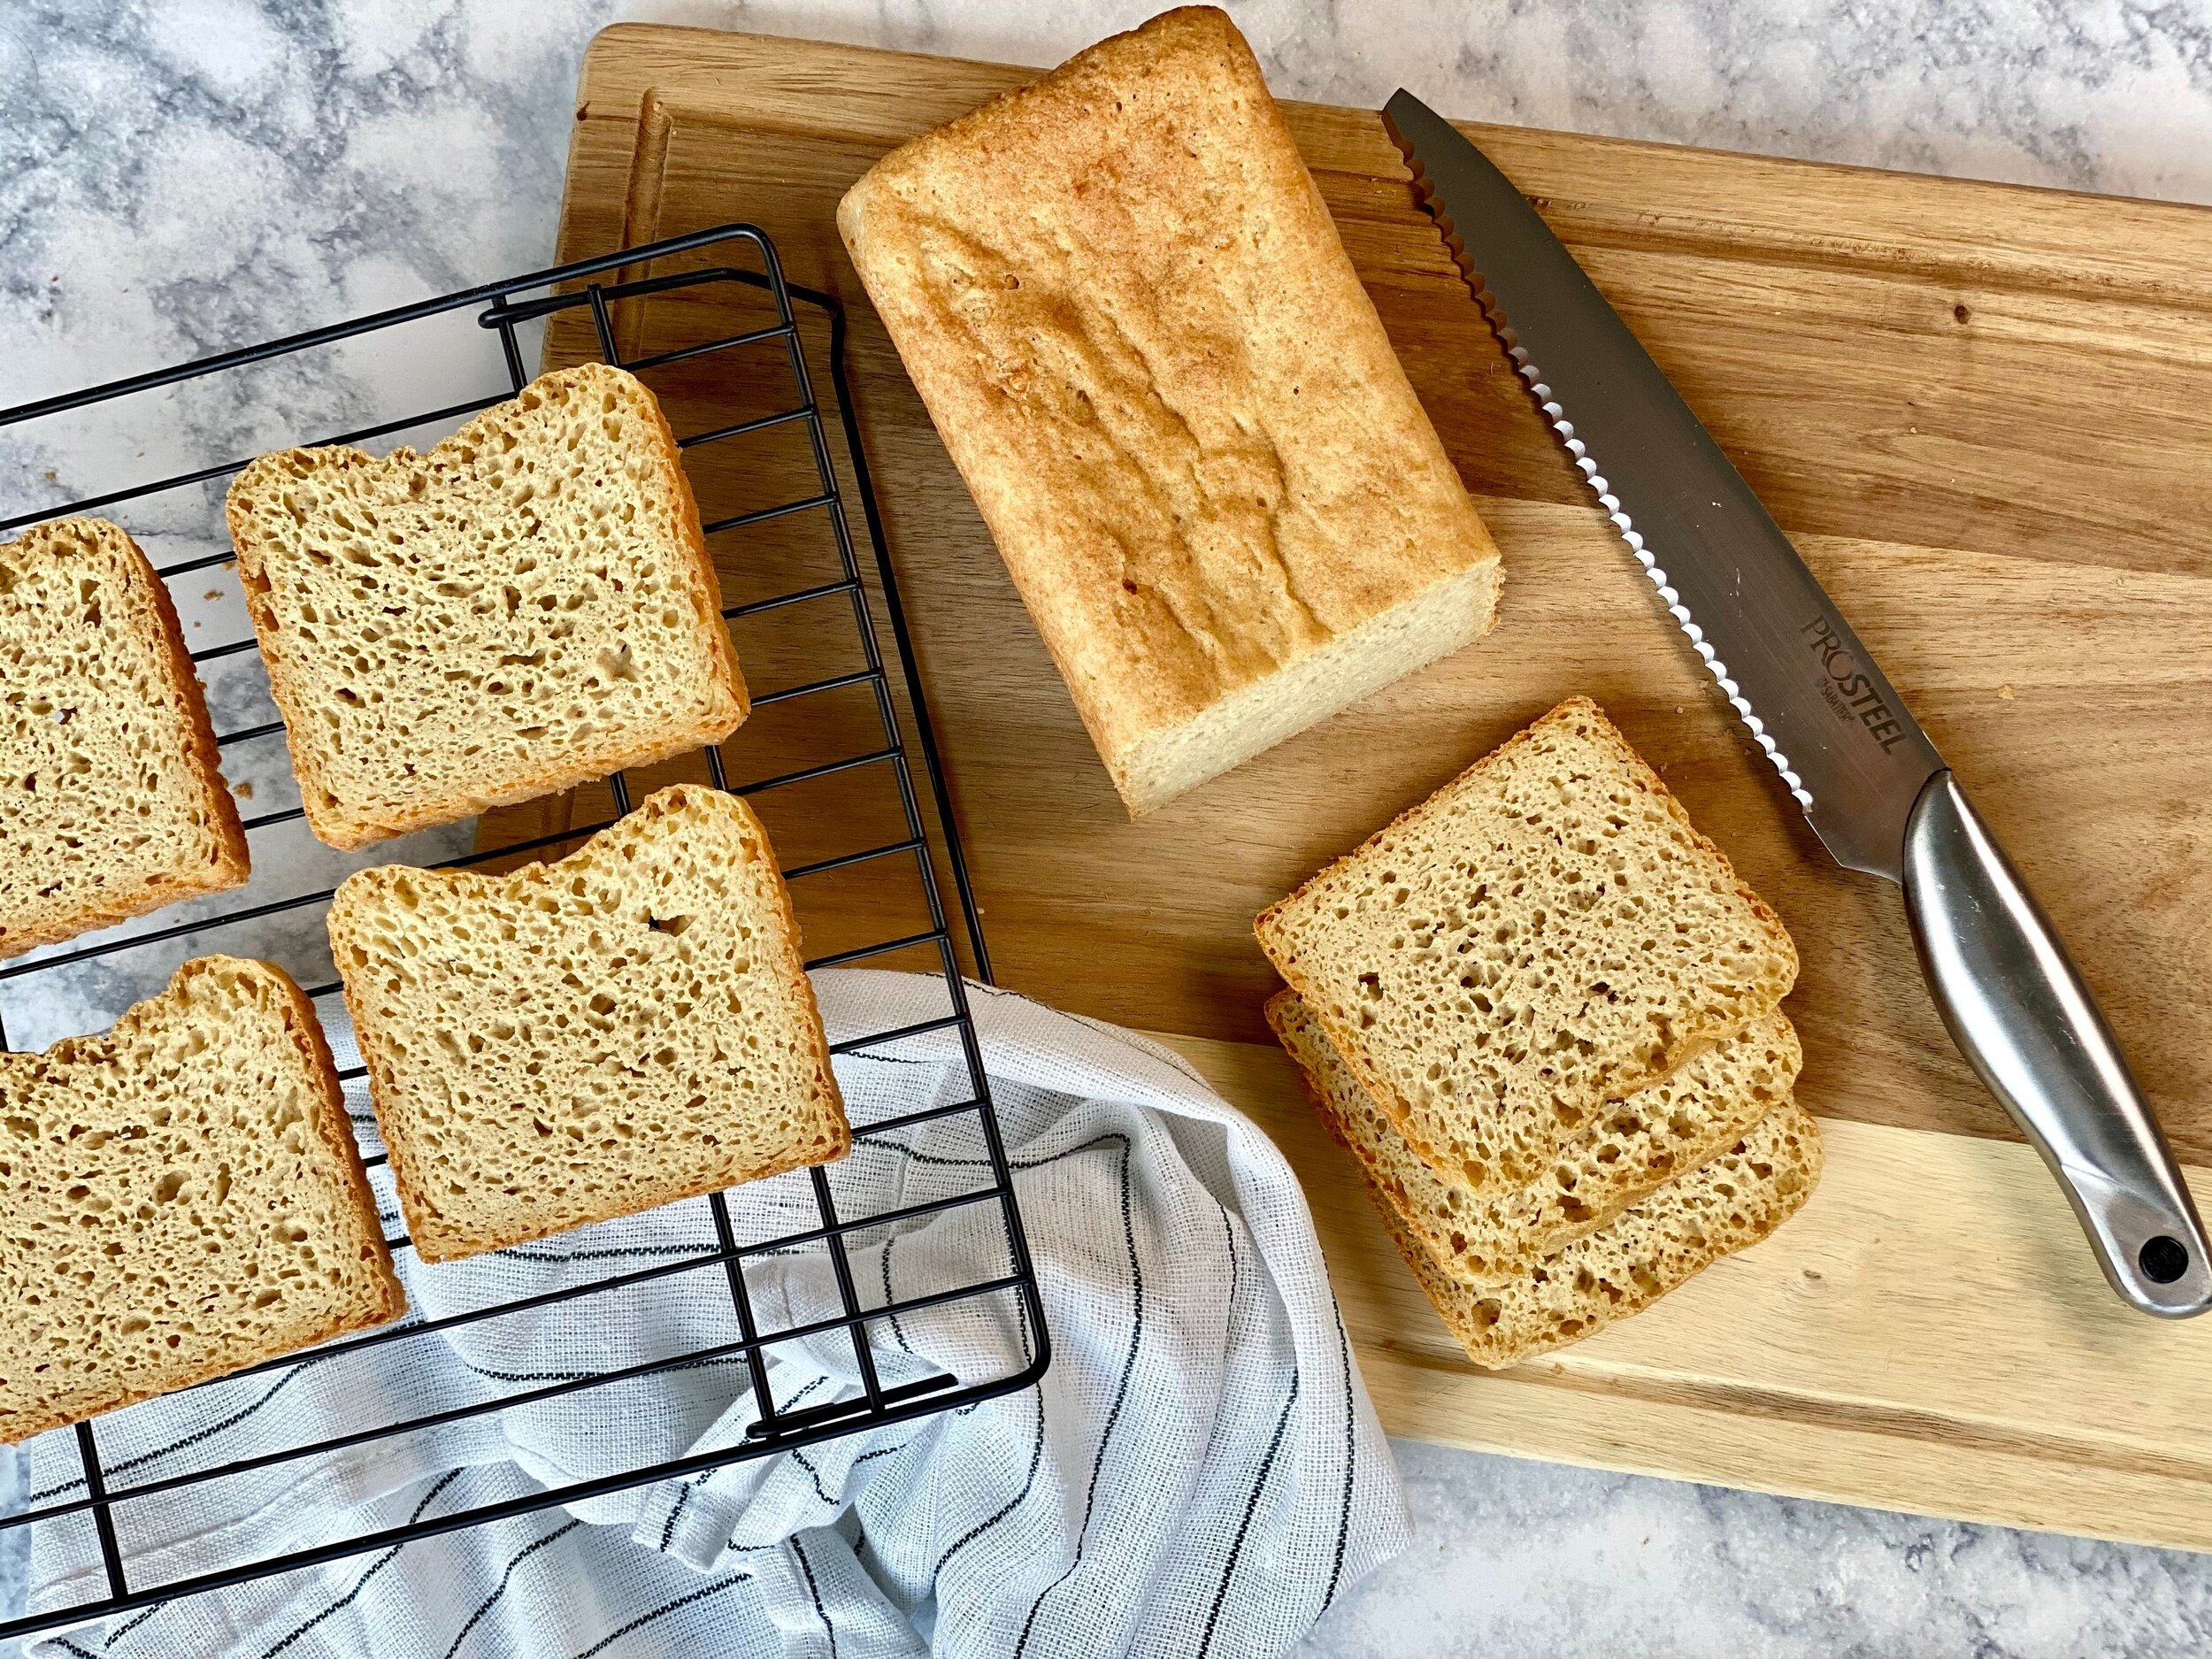
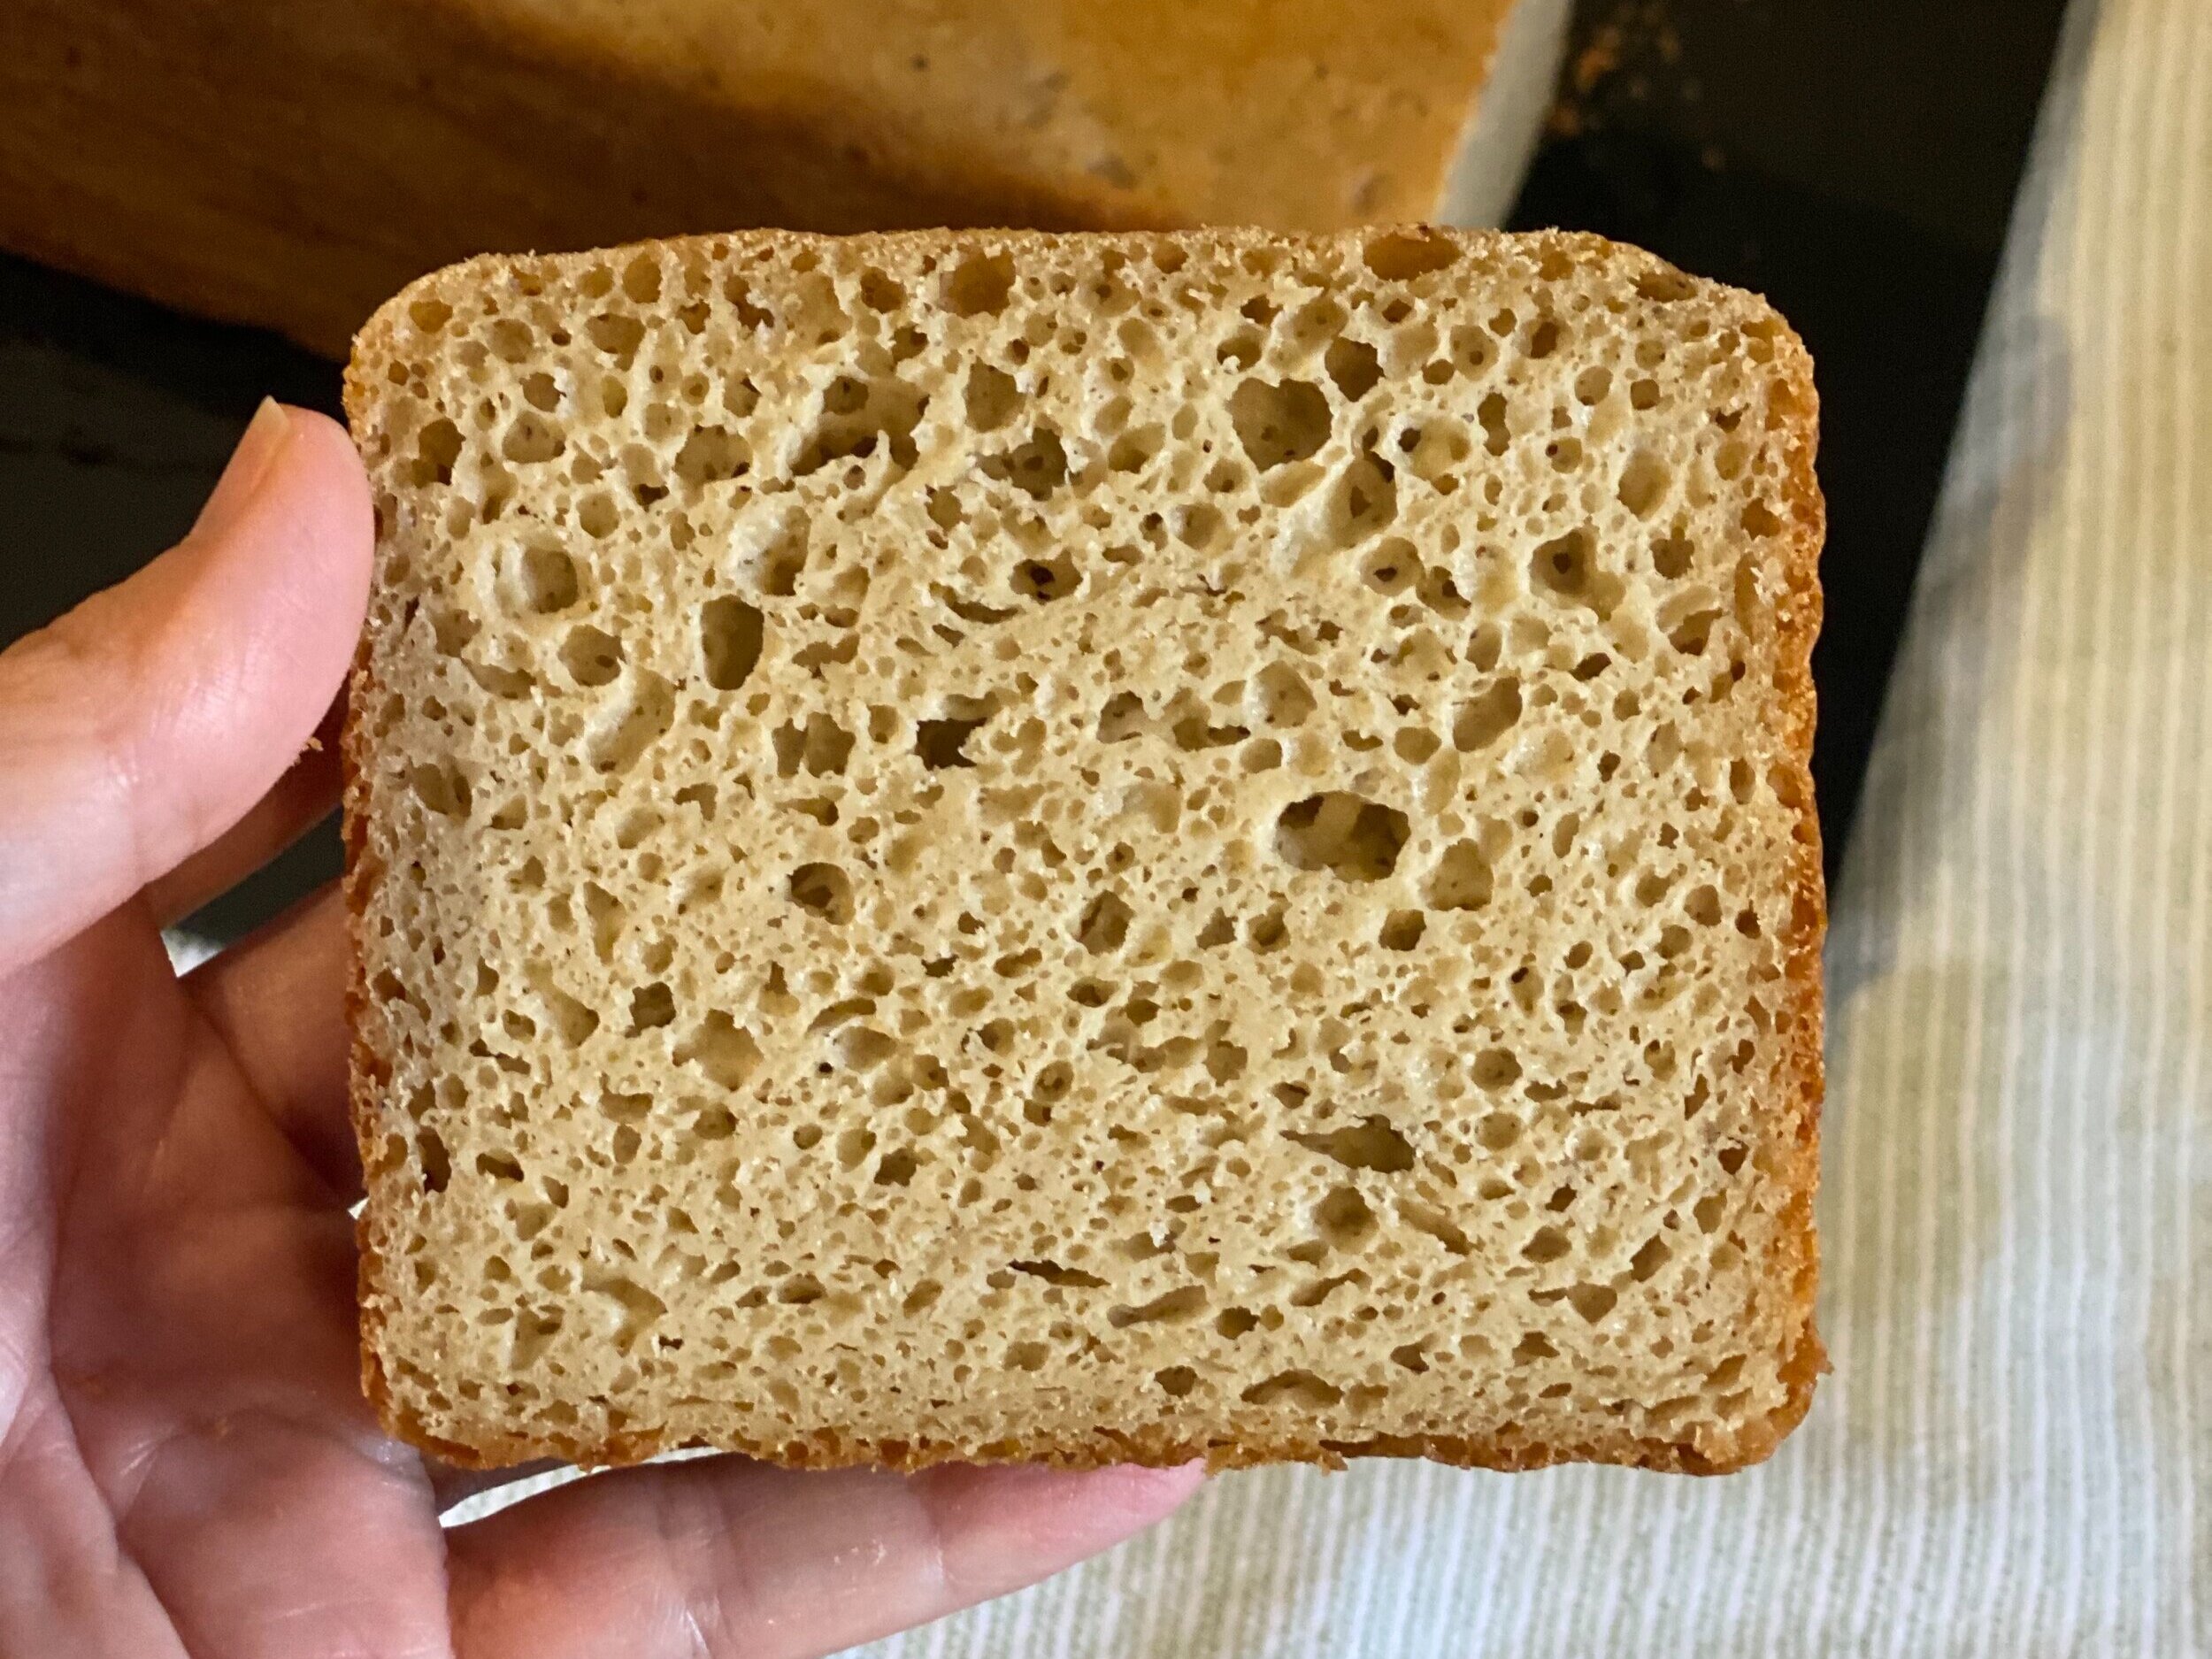
Lectin-free Sandwich Bread is the best.
This is one of my favorite go-to recipes for sandwich bread. I like to use it for everything from French toast sticks to breadcrumbs & croutons. This makes for a great size bread for making sandwiches because it is very spongy and doesn't have a large crumb.
A note about the weather- I live in Houston, Texas- where the humidity is always high, the temperature is always hot, and it’s just about as close to sea level as you can get without an ocean view. Which can be confusing because I also keep our house cooled with the AC nearly year-round so, I actually end up proofing the bread in the garage where it is warm. Altitude, humidity, climate, and certain appliances can greatly effect proofing & baking times so baker beware. A fellow Lectin Free Wife baker—Felicia Koch, tried this recipe and discovered that 30 minutes was the perfect proofing time from Livonia Michigan with 676’ elevation.
The original recipe by Penny Au, used much more liquids however I found that this caused the bread to collapse when it cooled. This recipe has been adapted from Penny Au. Depending on where you live, you might need to add more water if you think the batter is too tough or is takes less time to proof. Unfortunately, this is kind of a trial and error situation because you can’t just add more water once you’ve already mixed the dough.

Let’s talk supplies-
In my experience, I find that all bread baking (especially lectin-free and gluten-free) requires the right kitchen tools. In my grandma’s day, she could look at a dough for a loaf of bread or a pie crust and tell you exactly how much more flour, moisture, or sugar it needed. Her hand written recipe cards include measurements like a pinch or a dash. Those days are gone when it comes to gluten-free and lectin-free baking. Maybe someday when I have my own grandchildren, I’ll be the OG of lectin-free baking.
Kitchen scale. I know, it’s a pain to get it out and weigh but it’s worth it when you sink your choppers into a slice of this yummy bread. I use this scale & I love it! It’s light weight, thin, and bamboo is a naturally antibacterial surface.
Digital Internal Thermometer is helpful to make sure your bread is cooked consistently. I use this digital thermometer. It’s actually a meat thermometer but it works well for breads and getting the perfect temperature oil for fried tempura.
Loaf Pan. I use a Pullman pan with a lid 4X4X9 but a good old fashioned loaf pan will work just as well. Using this Pullman pan has been a learning experience. The first time I experimented using the lid- the bread rose so high it exploded out of the holes like little snakes which fell down to the bottom of the oven and burnt all over the bottom of the oven. What a mess! I had to turn off the oven in the middle of the baking process and wait for the oven to cool and then scraped off the burnt mess. Disappointingly, that loaf of bread was lost but what I learned was to put a baking sheet in the rack below. That way if this ever happened again I could do better damage control and hopefully salvage the bread.
Stand Mixer. I haven’t tried this with a hand mixer or needing by hand so I wouldn’t recommend either of those methods. (However, I got a comment down below- that someone did mix this by hand and had good results. You can read their experience below) I use this Kitchen Aid stand mixer, this is a pricey appliance and I know some people will be on the fence about owning one but I can say it is one of the most frequently used kitchen appliances. If you are thinking about it. I say YES.
Binder Clips. This my holy grail of kitchen hacks when it comes to making bread. I use binder clips to hold down the parchment paper so it stays out of the way, while I pour the dough into the prepared pan without the parchment paper collapsing in my way.
Notes for Storage…
This bread has no preservatives in it. Which is the point of homemade bread, right? All of the good stuff and none of the bad!
Depending on where you live and humidity levels-you may have a problem with your freshly baked bread growing mold in a couple days. Ewww. Remember, I live in Texas where the humidity is 80-100% nearly every single day. Warning: Bread in Texas on the counter lasts about 3 days, so there’s not a lot of thinking time. Best to have a plan with how you want to use it before you bake. Here’s some of my tips on how I make my loaf of bread last the longest.
Here’s some ideas if you want to…
Make Sandwiches. Here’s what I do if I’m going to make the whole loaf into sandwiches. I wait for the bread to cool and then cut the entire loaf into slices with a serrated knife. Then I cut parchment paper into squares (slightly bigger that a slice of bread) and place a parchment paper squares in between each slice of bread. Transfer the slices and parchment paper into a large zipper bag. Seal and freeze. When you are ready to make a sandwich, simply remove the amount of bread needed and leave the parchment paper squares in the bag for the next time.
Casual Counter Bread. Sometimes I don’t have a purpose for baking bread- I just want bread OR maybe I want to make my family a special treat like french toast sticks. If I’m undetermined on how I’ll use the loaf of bread-I’ll leave the whole loaf on the counter, on a cutting board, covered with a dish towel, then I’ll slice with a serrated knife as needed BUT do not cut the whole loaf at once if you plan to leave on the counter. (This will make the bread dry out.) If the cut side of the bread has sat on the counter for a day or is exposed to the air the I cut that end off and disregard or save for breadcrumbs.
Out of time. What happens when it’s day 3 and I haven’t used all the bread yet? I’m glad you asked. Don’t throw away that precious loaf just yet. You can still cut up what’s left and then make breadcrumbs or croutons. Store your croutons or bread crumbs in the freezer and they are ready to use immediately when you need them. Breadcrumbs are like GOLD in the lectin-free diet since you can make so many things like salmon patties, meatballs, veggie nuggets, coconut shrimp, or crunchy mac-n-cheese. Mmmm!

Best Sandwich Bread
INGREDIENTS
Here’s all the goodies you need to make the Best Sandwich Bread.
Dry Ingredients
127 g Blanched Almond Flour
127 g Millet Flour
28 g Tapioca Flour
65 g Arrowroot
18 g Psyllium Husk Powder (must be powder not whole husks)
1 1/2 tsp Salt
Wet Ingredients
4 eggs (room temperature)
1 tsp apple cider vinegar
1/4 c avocado oil
Yeast Ingredients
200 ml Lukewarm Water 105°-110°
1 tsp honey
12 g Active Dry Yeast (Do not use instant)

INSTRUCTIONS
Here’s how to make the Best Sandwich Bread at home.
Combine dry ingredients in the bowl of the stand mixer with a whisk attachment
In a separate medium bowl, mix wet ingredients with whisk until combined
In a glass measuring cup add the honey to the lukewarm water. Then add the yeast and give it a small stir to allow the yeast to touch the water. Set a timer for 5 minutes for the yeast to proof
Add the wet ingredients to the dry ingredients, mix on low until liquid is combined and turn off mixer
After 5 minutes, check yeast and make sure it is frothy or foamy. This means the yeast is activated and ready to use. Pour the yeast mixture in the bowl of the stand mixer and turn the mixer on low to combine. Turn off to scrape down sides as needed
Turn mixer to med/high for 7 minutes
In the meantime, grease loaf pan with compliant shortening and line with parchment paper. Make sure you get the corners/sides very well. If you are using a loaf pan with the lid be sure to grease the bottom of lid. Attach a binder clip to each side to hold parchment paper down
Batter should be sticky and dough-like texture at the end of the 7 minutes. Use a spatula to scrape dough into pan and smooth top and edges with spatula
Put batter in enclosed space to proof for 1 hour and 45 min. Do not cover. Proofing will be ready when top of dough rises close to top of pan. Edges will still be lower that the center of bread. (depending on your altitudes proofing time may be as little as 30 minutes, check continually) (See proofing picture below)
Towards the end of the breads proofing time-turn on oven to 375° and adjust oven shelves so bread can bake on center rack
Remove binder clips and slide on lid into locked position (Skip this step if not using the loaf pan with lid)
Put pan in oven, on center rack, and bake for 30 minutes. Remove lid and bake for additional 10 min to get evenly browned crust. (Skip the lid removal step if not using a pan with a lid and bake continuously for the entire 40 min)
Use internal thermometer to check temperature in 3 different places to make sure bread has cooked evenly. Temperature should be around 205° to 210°
Immediately remove bread from pan and place on cooling rack for 3-4 hours. (You can use a bread knife to loosen edges if needed but should come out easily if properly greased)
Once completely cooled, use a serrated knife to slice bread and enjoy.

Here’s the Recipe…

Best Sandwich bread
Ingredients
- 127 g Blanched Almond Flour
- 127 g Millet Flour
- 28 g Tapioca Flour
- 65 g Arrowroot
- 18 g Psyllium Husk Powder (must be powder not whole husks)
- 1 1/2 tsp Salt
- 4 eggs (room temperature)
- 1 tsp apple cider vinegar
- 1/4 c avocado oil
- 200 ml Lukewarm Water 105°-110°
- 1 tsp honey
- 12 g Active Dry Yeast (Do not use instant)
Instructions
- Combine dry ingredients in the bowl of the stand mixer with a whisk attachment
- In a separate medium bowl, mix wet ingredients with whisk until combined
- In a glass measuring cup add the honey to the lukewarm water. Then add the yeast and give it a small stir to allow the yeast to touch the water. Set a timer for 5 minutes for the yeast to proof
- Add the wet ingredients to the dry ingredients, mix on low until liquid is combined and turn off mixer
- After 5 minutes, check yeast and make sure it is frothy or foamy. This means the yeast is activated and ready to use. Pour the yeast mixture in the bowl of the stand mixer and turn the mixer on low to combine. Turn off to scrape down sides as needed
- Turn mixer to med/high for 7 minutes
- In the meantime, grease loaf pan with compliant shortening and line with parchment paper. Make sure you get the corners/sides very well. If you are using a loaf pan with the lid be sure to grease the bottom of lid. Attach a binder clip to each side to hold parchment paper down
- Batter should be sticky and dough-like texture at the end of the 7 minutes. Use a spatula to scrape dough into pan and smooth top and edges with spatula
- Put batter in enclosed space to proof for 1 hour and 45 min. Do not cover. Proofing will be ready when top of dough rises close to top of pan. Edges will still be lower that the center of bread. (depending on your altitudes proofing time may be as little as 30 minutes, check continually)
- Towards the end of the breads proofing time-turn on oven to 375° and adjust oven shelves so bread can bake on center rack
- Remove binder clips and slide on lid into locked position (Skip this step if not using the loaf pan with lid)
- Put pan in oven, on center rack, and bake for 30 minutes. Remove lid and bake for additional 10 min to get evenly browned crust. (Skip the lid removal step if not using a pan with a lid and bake continuously for the entire 40 min)
- Use internal thermometer to check temperature in 3 different places to make sure bread has cooked evenly. Temperature should be around 205° to 210°
- Immediately remove bread from pan and place on cooling rack for 3-4 hours. (You can use a bread knife to loosen edges if needed but should come out easily if properly greased)
- Once completely cooled, use a serrated knife to slice bread and enjoy.
Notes
ProTIP: Use metal binder clips to secure parchment paper to pan when pouring in batter so parchment paper doesn’t fall and get in your way.


Try one of these…


-
Lectin free bread recipe, lectin free bread, dr Gundry bread recipe, Gundry bread recipe, dr Gundry lectin free bread recipe, lectin free bread recipe, dr Gundry bread, plant paradox bread recipe, lectin free wife, lectin free Australia, what bread is lectin free-free, Gundry bread, where to buy lectin free bread, dr Gundry barely bread recipe, dr Gundry sourdough bread recipe, bread without lectins, lectin free bread brands, lectin free recipes, free wife, what bread does dr. Gundry recommend? Lectin free diet