

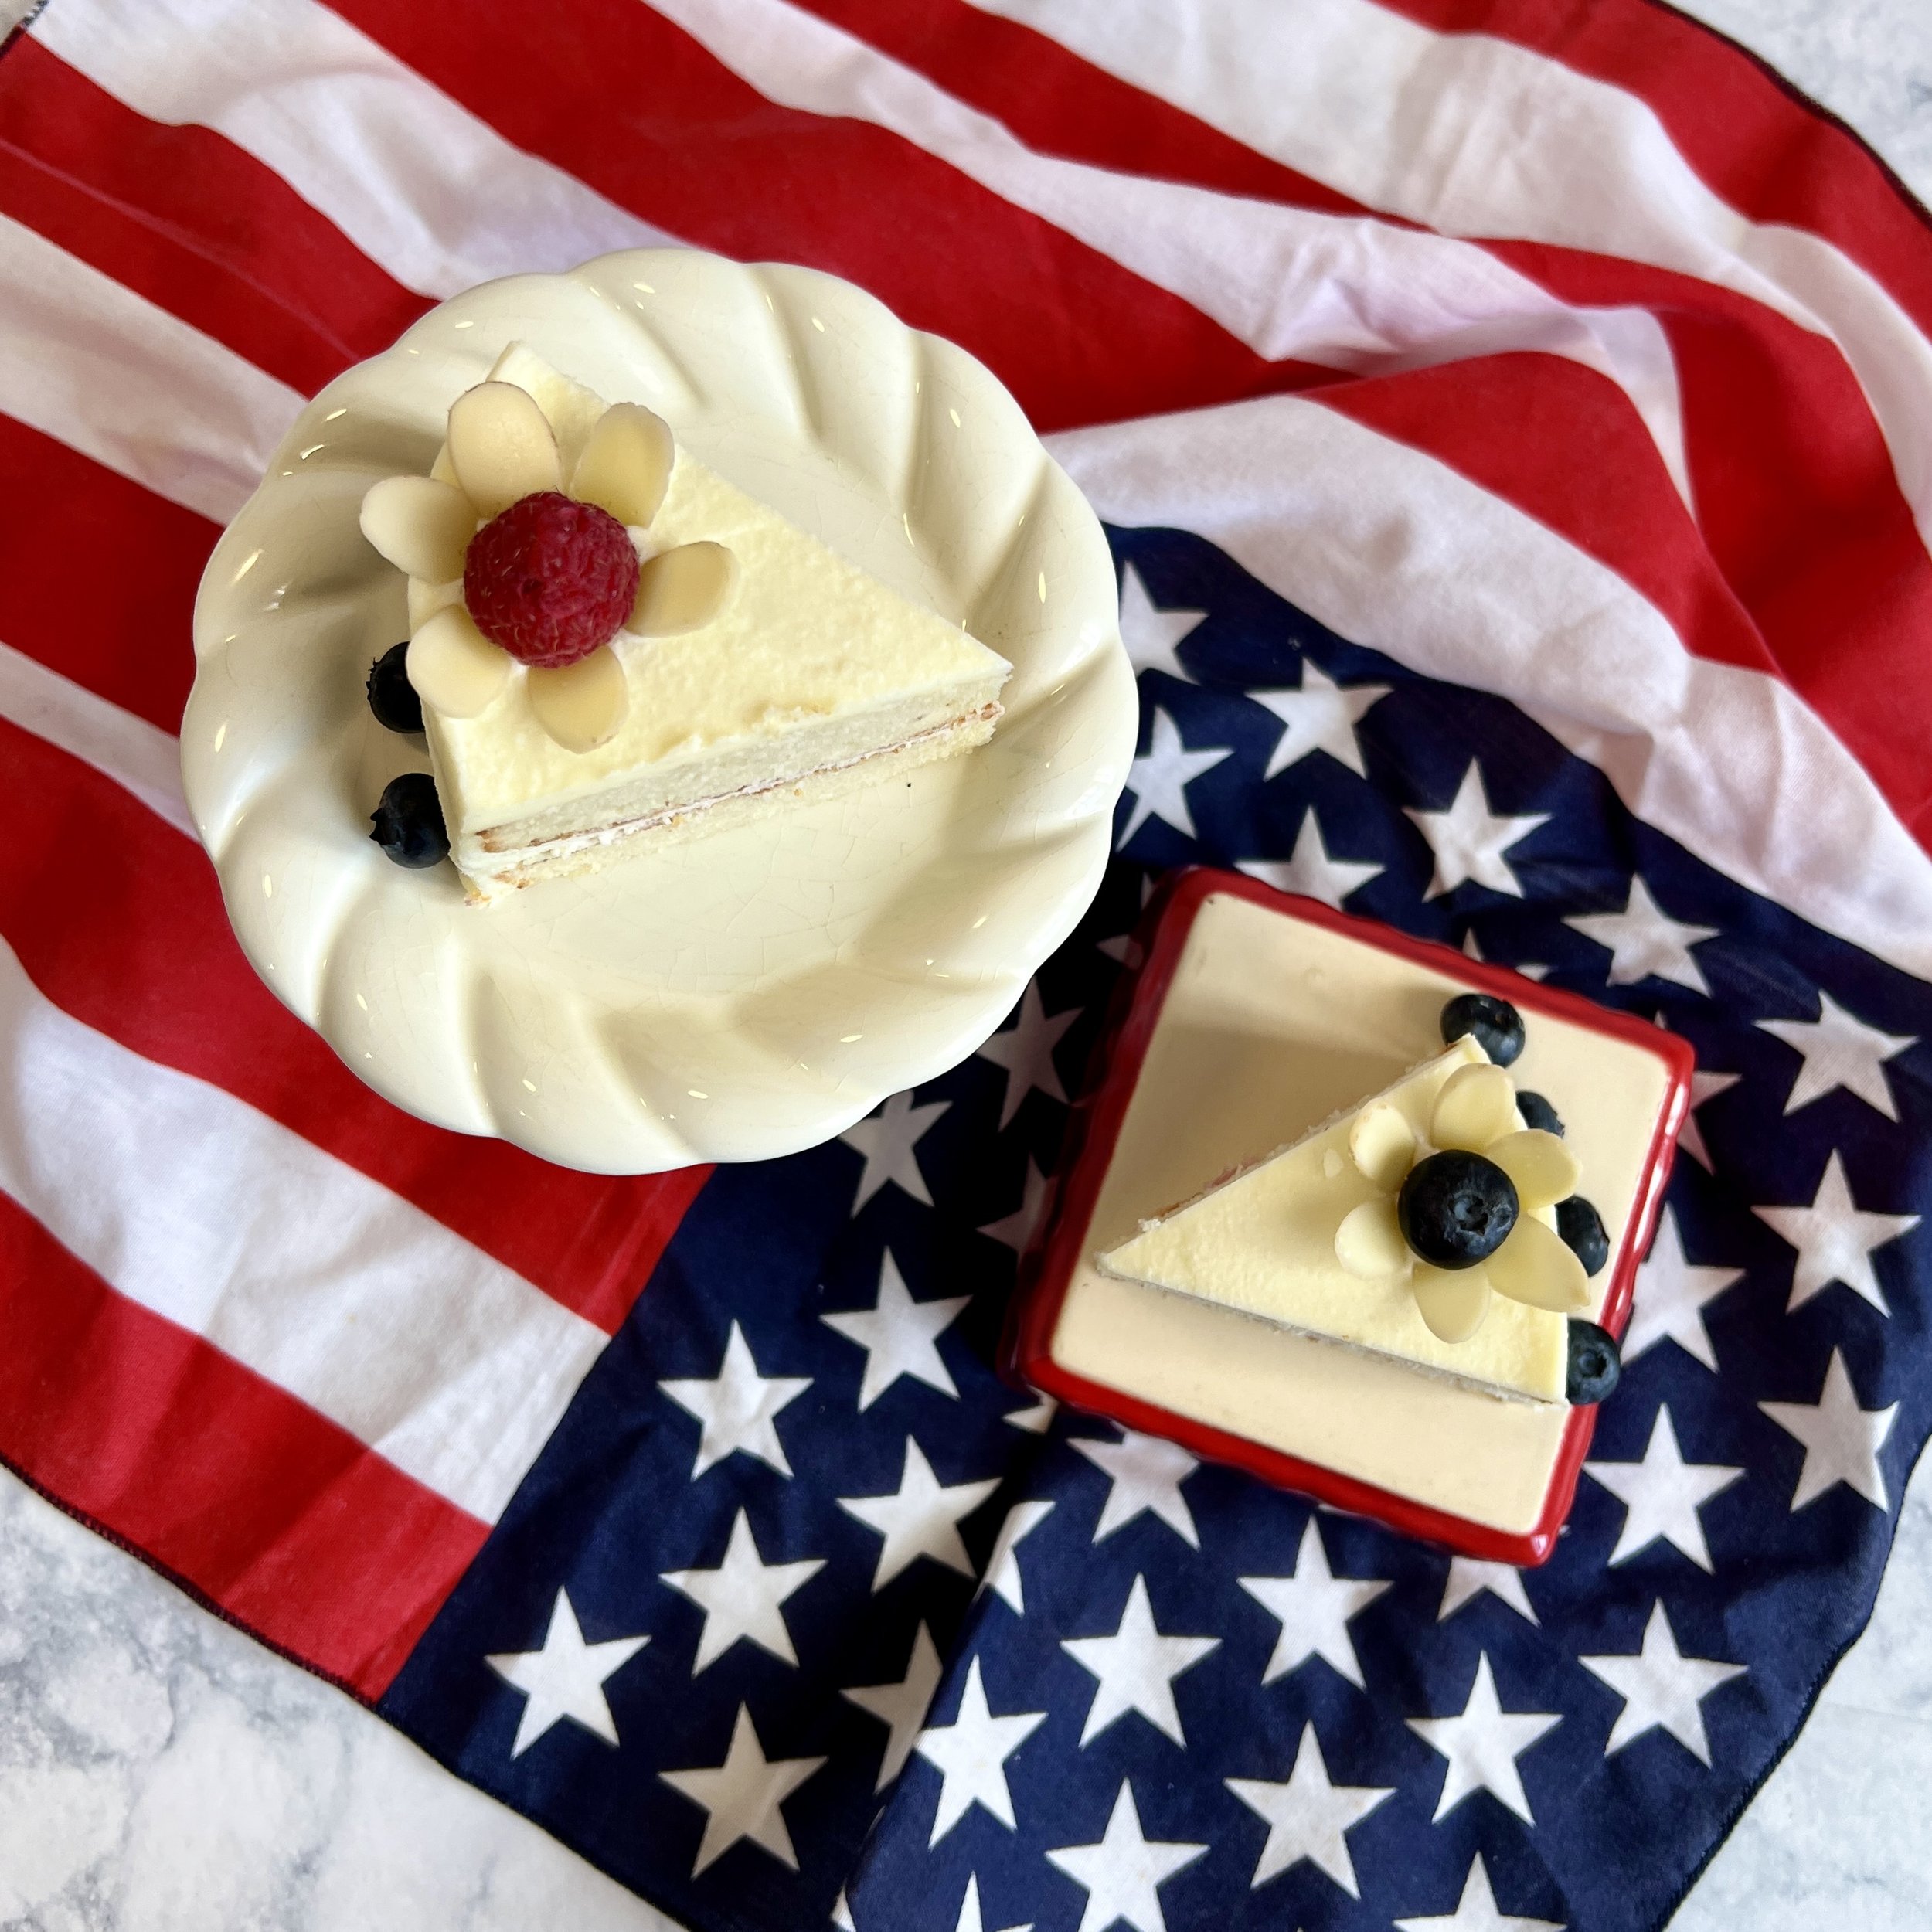
Red, White, & Blueberry Cake
As we gear up to celebrate the glorious 4th of July, it's time to put on our aprons, raise our mixers high, and prepare for a delightful explosion of flavors that will make fireworks pale in comparison. Get ready for a slice of pure Americana with a lectin free cake recipe—our playful and perfectly patriotic Red, White, and Blueberry Cake!
This scrumptious treat is a true ode to the red, white, and blue, bursting with wholesome ingredients and free from those sneaky culprits like lectins, gluten, and sugar. We've crafted a Dr Gundry dessert recipe, a culinary marvel that will satisfy your taste buds and keep you feeling your best during the festivities. So, grab your baking essentials and let's dive into this delightful creation!

Between the two layers of this gloriously moist white cake, we've injected a vibrant burst of flavor into each slice with a generous filling of tangy raspberry jam. Brace yourself for the magical moment when you take that first bite and feel the explosion of fruity goodness swirling with patriotism!
Now, let's talk frosting—because no lectin free cake is complete without it! Picture this: a velvety, white cream cheese frosting that's so smooth. This luscious goodness spreads like a dream and adds the perfect touch of indulgence to our patriotic masterpiece.

To take our 4th of July celebration to the next level, we've dotted the top of our cake with fresh, plump blueberries—nature's very own edible fireworks. These little blue bursts of delight add a pop of color and a burst of flavor that perfectly complements the raspberry-filled layers. It's like a festive fireworks display right on your plate!

So gather with loved ones under the starry sky, and let this Red, White, and Blueberry Cake be the sweet centerpiece of your patriotic feast. Revel in the joy of indulging in a cake that brings together the very best of America—liberty, unity, and of course, some seriously scrumptious ingredients!

Happy 4th of July, everyone! Let's celebrate our nation's independence, one delectable slice at a time. Taste the freedom, and let your taste buds sing the sweetest rendition of the Star-Spangled Banner!
Red, White, & Blueberry Cake
Let’s break this cake down into 5 sections.
White Cake
Red Raspberry Filling
White Cream Cheese Frosting
Assembling the cake
Blueberry Flowers and Decorating
1. White Cake
Here are the goodies you need to make the White Cake. The measurements are in standard US measurements.
1 c blanched almond flour (100 g or 240 ml)
1/4 c tapioca starch (30 g or 30 ml)
1/4 c coconut flour (25 g or 30 ml)
2 tsp baking powder like Otto's (10 ml)
1/4 tsp iodized sea salt (1.25 ml)
1/4 c coconut oil in liquid form (not hot) (55 g or 60 ml)
1 tsp vanilla extract (5 ml)
1/2 c plain yogurt (120 g or 120 ml)
1/2 c monkfruit/allulose blend (100 g or 120 ml)
5 pasture-raised eggs- whites only
Here’s how to make the White Cake.
Preheat oven to 350° F, grease (2) 6-inch round cake pans, and line with parchment paper.
Whisk together almond flour, tapioca starch, coconut flour, baking powder, and salt in a large bowl.
Add the melted (but not hot) coconut oil and sour cream on high for one minute in the bowl of the stand mixer fixed with the whisk attachment.
Reduce the speed to medium and add the sweetener. Continue mixing until combined. Turn off the mixer, scrape the sides of the bowl, and reincorporate the sweetener into the batter—resume mixing on medium until thoroughly mixed.
Turn the mixer to high and drizzle the egg whites slowly down the edge of the bowl until all the egg whites are added to the batter. Turn off the mixer and use a spatula to scrape the sides and reincorporate into the batter. Turn the mixer back on to medium and add vanilla extract.
Slowly add the bowl of flour to the batter with the mixer on medium. Scrape the sides of the mixer bowl and reincorporate the batter from the bottom to the top. Continue mixing until unified in texture.
Divide the batter evenly into the prepared pans. Wrap pans on the counter a couple of times to allow the batter to fill the edges of the pan evenly and smooth the top. (Use an offset spatula to smooth the top of the cake if needed. This cake will not rise with a dome like a cake with gluten)
Bake both pans on the center rack for 25 minutes. Check for doneness by inserting a toothpick into the center of the cake. The cake is done baking when crumbs do not stick to the toothpick. (Make the raspberry filling while the cake bakes because it needs to be refrigerated before applying it to the cake)
Remove the cakes from the oven onto a wire rack and cool for 10 minutes in the pan. After 10 minutes, use a butter knife to run around the inside edge of the pan to ensure easy removal from the pan. To remove the cakes from the pans, place one hand over the top of the pan and one on the bottom, then flip the pan over, allowing the cake to fall into your hand; place the cake on a cooling rack until it reaches room temperature. (Please be sure to disregard the parchment paper immediately if it comes out with the cake before allowing it to rest at room temperature.)
Do not frost the cake until completely cooled.

2. Red Raspberry filling
Here are all the goodies you need to make the RED Raspberry Filling.
1/2 c fresh raspberries (whole, about 10-15 berrys depending on size)
2 tbsp water
3 tsp tapioca starch (15 ml)
1 tsp vanilla extract (5 ml)
1 lemon juiced
1 tsp monkfruit sweetener granulated
Here’s how to make the RED Raspberry Filling.
Make a slurry in a small container by mixing the tapioca starch, extract, juice from lemon, and monkfruit sweetener. Set aside.
In a separate heat-proof glass cup or coffee cup, microwave raspberries and water for 30 seconds and stir with a fork. (The berries will boil and burst. Use a cup with higher sides to avoid boiling over.)
Use an immersion blender to puree the seeds in the hot raspberry puree.
Add the slurry to the raspberry puree and blend with a fork simultaneously.
Return the cup to the microwave. Microwave for 20 seconds and then stir with a fork. Repeat this step 2 more times, stirring with a fork between each time microwaving.
Place the cup in the refrigerator and do not use it on the cake until cooled to room temperature or cooler. PRO TIP: Do not skip this step. Using the raspberry filling on the cake when it is hot will cause the frosting to melt, and the layers will slide off of one another.
3. White cream cheese frosting
Here are all the goodies you need to make the White Cream Cheese Frosting.
8 oz organic cream cheese (250 g) (room temperature)
4 oz goats milk butter (113 g) (room temperature)
1/2 c monkfruit/allulose powdered sweetener (100 g)
1 tsp vanilla extract (5 ml)
blanched sliced almonds (optional for decoration)
fresh blueberries (optional for decoration)
fresh raspberry (optional for decoration)
Here’s how to make the White Cream Cheese Frosting.
Sift the sweetener in a fine mesh strainer. Set aside.
In the bowl of the stand mixer with the paddle attachment, mix the cream cheese until fluffy, and add butter until combined. Scrape down the sides with a spatula if needed.
Add in the sweetener until combined.
Add the extract and whisk until combined.
Frost a cool cake. See the blog post for tips on how to frost and layer cake. Use almonds, raspberries, and blueberries for decorations if using. Use (3) toothpicks to secure the layers from sliding apart for a layered cake.
4. Assembling the cake
Here’s how to assemble the cake.
Assembling the cake is fun, but this is where things can go terribly wrong. I’ve been assembling layered cakes for many years and learned some valuable tips along the way. Albeit some were learned the hard way but the good news is, I’m going to guide you through the process so your cake comes out beautiful the first time. Let's cover some rules, and then I will share the procedure.
Rule #1 Everything should be at room temperature before assembling the cake. This rule is the reason there is a cake section in Pinterest Fails. If you skip this step, your cake may slide apart. This is particularly important with cakes like this one with a jam-like filling.
Rule #2 Get the right tools for the job. When it comes to layering a cake, you NEED these three things. 1.) A pedestal cake stand 2.) Parchment paper cut into a couple of inch wide strips 3.) Small/medium offset spatula

SHOP my Amazon storefront.
Start layering like this…

Easy as 1, 2, 3, 4…
STEP 1- Place the first layer of cake on the pedestal cake stand. Slide the strips of parchment paper under the cake until the plate of the pedestal is covered. You do this so your plate stays clean if you accidentally drop frosting on the plate. Use your non-dominant hand to hold the stand and the dominant hand to slather on a thick layer of frosting with the offset spatula. Use one hand to turn the base of the pedestal and the other hand to smooth the frosting over the top. Use your finger or the back of the offset spatula to create a thick and deep ridge at the edge of the cake, creating a pool to hold the filling. If this is difficult, you can fill up a zipper bag with some frosting and pipe a thick circle around the outside edge. **The goal is to make the ridge high enough to create a pool for the raspberry filling. Place the cake in the fridge for 15 minutes.

STEP 2-Remove the cake from the fridge and pour in the raspberry filling. The raspberry filling should not overflow over the sides of the pool. Use the offset spatula to even out the filling.
STEP 3- Next, we will need to create a frosting barrier that will allow the raspberry filling to stay in the middle of the cake instead of seeping into the cake like a sponge. To do this, hold the second layer of cake upside down in your hand. Cover it with a thin layer of frosting.
STEP 4- Carefully flip the cake over and place the frosted side of the cake onto the raspberry filling. The top of the cake should not have frosting see image (4) for reference. Gently press evenly on the top cake until the white frosting begins to bulge out from between the two layers of cake. Do not press too hard so that the raspberry filling runs out. Secure the layers by placing 3 toothpicks vertically through the layers. (you can skip this step, but I do not recommend)
5. Blueberry flowers & decorating
Finish frosting the top and side of the cake. Use the same technique from earlier, using your not-dominate hand to rotate the base of the pedestal and the dominant hand to smooth the frosting with the offset spatula. Then place the cake in the refrigerator for 25 minutes.
Remove the cake from the fridge. Run a pairing knife between the base of the cake and the parchment paper. Gently begin sliding the strips of parchment paper out from under the cake until they have all been removed.
To create the berry blossoms: place the berries on the cake and then use tweezers to place the almond slices at a 45° angle to give the pedals a 3-dimensional look.
Here’s the printable recipe…

Red, White, & Blueberry Cake
Ingredients
- 1 c blanched almond flour (100 g or 240 ml)
- 1/4 c tapioca starch (30 g or 30 ml)
- 1/4 c coconut flour (25 g or 30 ml)
- 2 tsp baking powder like Otto's (10 ml)
- 1/4 tsp iodized sea salt (1.25 ml)
- 1/4 c coconut oil in liquid form (not hot) (55 g or 60 ml)
- 1 tsp vanilla extract (5 ml)
- 1/2 c plain yogurt (120 g or 120 ml)
- 1/2 c monkfruit/allulose blend (100 g or 120 ml)
- 5 pasture-raised eggs- whites only
- 8 oz organic cream cheese (250 g) (room temperature)
- 4 oz goats milk butter (113 g) (room temperature)
- 1/2 c monkfruit/allulose powdered sweetener (100 g)
- 1 tsp vanilla extract (5 ml)
- blanched sliced almonds (optional for decoration)
- fresh blueberries (optional for decoration)
- fresh raspberry (optional for decoration)
- 1/2 c fresh raspberries (whole, about 10-15 berrys depending on size)
- 2 tbsp water
- 3 tsp tapioca starch (15 ml)
- 1 tsp vanilla extract (5 ml)
- 1 lemon juiced
- 1 tsp monkfruit sweetener granulated
Instructions
- Preheat oven to 350° F, grease (2) 6-inch round cake pans, and line with parchment paper.
- Whisk together almond flour, tapioca starch, coconut flour, baking powder, and salt in a large bowl.
- Add the melted (but not hot) coconut oil and sour cream on high for one minute in the bowl of the stand mixer fixed with the whisk attachment.
- Reduce the speed to medium and add the sweetener. Continue mixing until combined. Turn off the mixer, scrape the sides of the bowl, and reincorporate the sweetener into the batter—resume mixing on medium until thoroughly mixed.
- Turn the mixer to high and drizzle the egg whites slowly down the edge of the bowl until all the egg whites are added to the batter. Turn off the mixer and use a spatula to scrape the sides and reincorporate into the batter. Turn the mixer back on to medium and add vanilla extract.
- Slowly add the bowl of flour to the batter with the mixer on medium. Scrape the sides of the mixer bowl and reincorporate the batter from the bottom to the top. Continue mixing until unified in texture.
- Divide the batter evenly into the prepared pans. Wrap pans on the counter a couple of times to allow the batter to fill the edges of the pan evenly and smooth the top. (Use an offset spatula to smooth the top of the cake if needed. This cake will not rise with a dome like a cake with gluten)
- Bake both pans on the center rack for 25 minutes. Check for doneness by inserting a toothpick into the center of the cake. The cake is done baking when crumbs do not stick to the toothpick. (Make the raspberry filling while the cake bakes because it needs to be refrigerated before applying it to the cake)
- Remove the cakes from the oven onto a wire rack and cool for 10 minutes in the pan. After 10 minutes, use a butter knife to run around the inside edge of the pan to ensure easy removal from the pan. To remove the cakes from the pans, place one hand over the top of the pan and one on the bottom, then flip the pan over, allowing the cake to fall into your hand; place the cake on a cooling rack until it reaches room temperature. (Disregard the parchment paper immediately if it comes out with the cake before allowing it to rest at room temperature.)
- Do not frost the cake until completely cooled.
- Sift the sweetener in a fine mesh strainer. Set aside.
- In the bowl of the stand mixer with the paddle attachment, mix the cream cheese until fluffy, and add butter until combined. Scrape down the sides with a spatula if needed.
- Add in the sweetener until combined.
- Add the extract and whisk until combined.
- Frost a cool cake. See the blog post for tips on how to frost and layer cake. Use almonds, raspberries, and blueberries for decorations if using. Use (3) toothpicks to secure the layers from sliding apart for a layered cake.
- In a small container, make a slurry by mixing together the tapioca starch, extract, juice from lemon, and monkfruit sweetener. Set aside.
- In a separate heat-proof glass cup or coffee cup, microwave raspberries and water for 30 seconds and stir with a fork. (The berries will boil and burst. Use a cup with higher sides to avoid boiling over.)
- Use an immersion blender to puree the seeds in the hot raspberry puree.
- Add the slurry to the raspberry puree and blend with a fork simultaneously.
- Return the cup to the microwave. Microwave for 20 seconds and then stir with a fork. Repeat this step 2 more times, stirring with a fork between each time microwaving.
- Place the cup in the refrigerator and do not use it on the cake until cooled to room temperature or cooler. PRO TIP: Do not skip this step. Using the raspberry filling on the cake when it is hot will cause the frosting to melt, and the layers will slide off of one another. See the blog post for tips on layering cake.


Lectin-free food lists are here…


Try these lectin-free recipes next! ↓↓↓


-
Lectin free cake, lectin free cake recipe, lectin free desserts, dr Gundry dessert recipes, lectin free desert, red white and blue, birthday cake recipes birthday cake recipe, sugar free birthday cake, 4th of July, red white blue food, red white blue food ideas, red white blue foods 4th of July, red white blue food dishes, red white blue flowers, gluten free cake, gluten free cake recipes